Use YAO Widget to create a dynamic forms system
70% of the functions of most business systems and admin panel are the addition, deletion, modification. The implementation of these functions is mainly based on copying and pasting modified fields. This article will try to write such functionality in a more elegant "copy-paste" way. If you want to say goodbye to tedious repetitive work, or you need to build your own cloud form system, the following content can help you.
DEMO
Through the form editor, online design and production of form function modules. Function modules suitable for user management, supplier management, order management and other form CURD operations.

Source address: https://github.com/YaoApp/demo-widget
One-click deployment: https://letsinfra.com/openapp/demo-widget
build tools
YAO App Engine
YAO is an open-source application engine, written in Golang, in the form of a command-line tool that can be downloaded and used immediately. It is suitable for developing business systems, website/APP API, admin panel, self-built low-code platforms, etc.
YAO adopts a flow-based programming model to implement various functions by writing YAO DSL (Logical Description in JSON format) or using JavaScript to write processes. The YAO DSL can be written in several ways:
Purely hand-written
Use automated scripts to generate contextual logic
Use the visual editor to create by "drag and drop"
GitHub Repo: https://github.com/yaoapp/yao Github Stars: 4.3K License: Apache 2.0 Documentation: https://yaoapps.com/doc
YAO Widget
YAO abstracts common function modules into widgets, describes differences through YAO DSL, and quickly replicates various functions. During development, if you develop a similar function module, you need to copy and paste the existing functions and replace the differences in batches. YAO provides a new way to use DSL to describe the difference content and quickly "copy and paste" a function module to improve development efficiency.
YAO has a built-in set of Widgets, covering most of the common functions of application development.
| Built-in Widget | Function |
|---|---|
| model | Data Structure Modeling |
| flow | Data logic arrangement |
| api | RESTFul API |
| table | table CURD |
| chart | data chart |
| login | User login |
| register | User registration |
| task | Concurrent tasks |
| schedule | Scheduled tasks |
| socket | Socket |
| websocket | WebSocket |
Widget supports developer customization, which can customize DSL based on its own business logic characteristics, and quickly copy various general functions. This article will implement a cloud table system by custom Widget.
Actual combat: Simple and practical cloud form system
Part I: Making a dyform Widget
Preparation: Install the YAO command
To read the following content, you need to have basic programming ability, familiar with RESTFul API, relational database, JavaScript language and other programming common sense. Reference Document Getting Started Guide, install the YAO command (version: v0.10.1) locally, and be familiar with the basic usage.
Create a project:
# Create a project foldermkdir -p /your/project/root# Initialize the projectyao init# Create data table & initialize menuyao migrate && yao run flows.setmenu
Step 1: Design the Widge DSL structure
Design the DSL structure according to the business logic features. In this example, the differences between different tables are table fields, searchers, and table names. dyform Widget DSL data structure:
{"name": "TEST","decription": "A TEST DYFORM","columns": [{"title": "First Name","name": "name","type": "input","search": true,"props": {"placeholder": "Please input your first name"}},{"title": "Amount","name": "amount","type": "input","search": true,"props": {"placeholder": "Please input amount"}},{"title": "Description","name": "desc","type": "textArea","props": {"placeholder": "Please input Description"}}]}
Fields:
| Field | Description |
|---|---|
| title | The title displayed in the table |
| name | Field name, corresponding to database field name |
| type | The component used when filling out the form |
| props | Component properties |
| search | Whether this field can be used as a filter item |
Create a dyforms file for saving the DSL
cd /your/project/rootmkdir dyforms
Save the above DSL to the dyforms/demo.form.json file for debugging.
Step 2: Create the dyform Widget
Create the dyform widget:
cd /your/project/rootmkdir -p widgets/dyform# create widget filetouch widgets/dyform/widget.json # Widget basic informationtouch widgets/dyform/compile.js # dyform DSL compilertouch widgets/dyform/process.js # dyform handlertouch widgets/dyform/export.js # dyform exports built-in widget definitions
Tip: YAO custom widgets are placed in the widgets directory, which needs to be created manually.
Use an editor to open dyform/widget.json and fill in the basic information of the dyform widget
{"label": "Dynamic Form","description": "A form widget. users can design forms online","version": "0.1.0","root": "dyforms","extension": ".form.json","modules": ["Models", "Tables"]}
Field Description:
| Configuration Items | Description |
|---|---|
| label | Widget name, displayed in the visual editor. |
| description | Widget introduction, displayed in the visual editor. |
| version | version number |
| root | DSL file save path (relative to the project root directory) |
| extension | DSL file extension |
| modules | Modules that need to be exported. According to the DSL description in export.js, the converted YAO built-in widgets. Such as model, table, etc. These widgets are equivalent to DSL files saved in the project directory. |
Step 3: Write the dyform handler
Write dyform/process.js script, implement Model, Table processor, convert custom DSL into YAO data model widget and table widget.
Write the Export function, declare the processor to be exported, View source
function Export() {return { Model: "Model", Table: "Table" };}
Implement Model & Table processor logic
| Processor | Description | Source link |
|---|---|---|
| Model | Convert dyform DSL to model DSL, which is equivalent to manually writing a xxx.mod.json DSL file in the models folder | [View source](https://github.com/YaoApp/demo-widget/blob/ main/widgets/dyform/process.js#L11) |
| Table | Convert dyform DSL to table DSL, which is equivalent to manually writing a xxx..json DSL file in the tables folder | [View source](https://github.com/YaoApp/demo-widget/blob/main /widgets/dyform/process.js#L27) |
Tip: It is recommended to use the yao run command to debug the processor, refer to the source code comment documentation.
Step 4: Export as Model & Table widget
Write dyform/export.js script, implement Models, Tables functions, export as YAO model & table widgets.
| Export function | Description | Source code link |
|---|---|---|
| Models | Call the Model processor to export the Yao model widget, the data structure is {MODEL_NAME:String: Model_DSL:Object} | [View source code](https://github.com/YaoApp/demo-widget/blob/main/widgets /dyform/export.js#L10) |
| Tables | Call the Table processor, export it as Yao table widget, the data structure is: {TABLE_NAME:String: Table_DSL:Object} | [View source code](https://github.com/YaoApp/demo-widget/blob/main /widgets/dyform/export.js#L24) |
Preview
In the dyforms folder, add the xxx.form.json file and write the dyform DSL description file to quickly create a set of form management modules, form APIs, form processors and model processors.
Use the yao migrate command to create the data table structure, the yao start command to start the service, and log in to the management interface to use the table management function. Routing address: http://127.0.0.1:5099/xiang/table/dyform.xxx
Part II: Save the dyform DSL to the database for dynamic read and write
If you want to open the form making function to the user, and the code directory should be set to read-only under normal circumstances, it is impossible to dynamically create a DSL file. With a little modification to the dyform widget, save the dyform DSL in the database.
Step 1: Create a template model to store the dyform DSL
How to create and use data models models/template.mod.json and manage tables tables/template.tab.json, refer to Model and Table
models/template.mod.json is as follows
{"name": "Template","table": { "name": "template", "comment": "For dyform DSL source" },"columns": [{ "label": "ID", "name": "id", "type": "ID", "comment": "ID" },{ "label": "Name", "name": "name", "type": "string", "index": true },{"label": "DSL","name": "dsl","type": "text","comment": "DSL"}],"values": [],"option": { "timestamps": true, "soft_deletes": true }}
DSL management interface

Step 2: Add Save & Delete handler to dyform Widget
Write the Export function, declare the processor to be exported, View source
function Export() {return { Model: "Model", Table: "Table", Save: "Save", Delete: "Delete" };}
Implement Save & Delete handler logic
| Processor | Description | Source link |
|---|---|---|
| Save | Convert the dyform DSL to the model DSL, update the corresponding data model structure, and reload the corresponding instance. | View source |
| Delete | Delete the data table corresponding to the data model | View source code |
Edit tables/template.tab.json, add hooks scripts, update/delete data tables, create/delete menus when tables are saved and deleted.
Modify tables/template.tab.json to add Hook View source code** **
"hooks": {"after:save": "scripts.template.AfterSave","after:delete": "scripts.template.AfterDelete"},
Add hooks script scripts/template.js View source code
| Hook | Instructions |
|---|---|
| AfterSave | According to the DSL, update the dyform data table and add a menu |
| Delete | Deletes the dyform table and removes the menu |
Step 3: Add content source to dyform Widget
Edit widgets/dyform/compile.js , read DSL from database
/*** Source* Where to get the source of DSL*/function Source() {var sources = {};tpls = Process("models.template.Get", { select: ["id", "dsl"], limit: 1000 });if (tpls.code && tpls.message) {log.Error("Load dyform sources: %s", tpls.message);return sources;}tpls.forEach((tpl) => {tpl = tpl || {};try {instance = `instance_${tpl.id}`;dsl = JSON.parse(tpl.dsl);sources[instance] = dsl;} catch (e) {log.Error("Source %v DSL: %s", tpl.id, e.message);return;}});return sources;}
Compile.js method description View documentation
| Hook | Instructions |
|---|---|
| Source | Custom DSL data source read logic |
| Compile | Adjust DSL structure or prepare related resources based on context or environment information |
| OnLoad | This method is called when the DSL is loaded. |
Preview
Log in to the management background and dynamically add dyform DSL to dynamically create and delete corresponding forms.

Part III: Visual Form Editor
The form DSL can be generated using the form authoring tool. There are many excellent open source form editors to choose from, such as XXXX. In order to demonstrate the effect, XGEN quickly implements a DEMO-level editor component, and the product-level implementation will Available when XGEN-NEXT (official version) is released.
Source address: [https://github.com/YaoApp/xgen/tree/main/src/cloud/components/form/FormPrinter](https://github.com/YaoApp/xgen/tree/main/src/cloud /components/form/FormPrinter)
Step 1: Adapt the editor component input and output
Add Hook to template table to transform DSL structure. Edit tables/template.tab.json file, scripts/template.js file
Add **before:save** hook
Convert editor component output to form DSL
tables/template.tab.json
{..."hooks": {"before:save": "scripts.template.BeforeSave","after:save": "scripts.template.AfterSave","after:delete": "scripts.template.AfterDelete"}...}
scripts/template.js
/*** BeforSave Hook: transform the form editor data to the DSL* @param {*} payload*/function BeforeSave(payload) {payload = payload || {};columns = payload.dsl || [];payload["dsl"] = { columns: [], name: payload.name || "UNTITLE" };columns.forEach((column) => {let type = column.id || "";payload["dsl"].columns.push({title: column.title || "UNTITLE",name: column.bind,type: type.toLowerCase(),props: column.props || {},});});payload["dsl"] = JSON.stringify(payload["dsl"]);return [payload];}
tips : But use the yao run command to debug for example:
yao run scripts.template.BeforeSave '::{"dsl":...}'
Add **after:find** hook
Convert form DSL to component input structure
tables/template.tab.json
{..."hooks": {"after:find": "scripts.template.AfterFind","before:save": "scripts.template.BeforeSave","after:save": "scripts.template.AfterSave","after:delete": "scripts.template.AfterDelete"}...}
scripts/template.js
/*** AfterFind Hook: transform the DSL format to the form editor needs* @param {*} id* @param {*} template*/function AfterFind(template, id) {let dsl = JSON.parse(template["dsl"]);let columns = dsl.columns || [];let types = { input: "Input", select: "Select" };template["dsl"] = [];columns.forEach((column) => {// let props = column.props || {};// let search = props.showSearch ? true : false;template["dsl"].push({title: column.title,bind: column.name,id: types[column.type],props: column.props || {},search: true,width: 6,chosen: false,selected: false,});});return template;}
Step 2: Update the components bound by the DSL
Edit the tables/template.tab.json file and set the DSL field editing component to FormPrinter.
Source address: [https://github.com/YaoApp/demo-widget/blob/main/tables/template.tab.json](https://github.com/YaoApp/demo-widget/blob/main/tables /template.tab.json)
{...."Form Editor": {"label": "Form Editor","edit": { "type": "FormPrinter", "props": { "value": ":dsl" } }}...}
Preview
Open the templates table, click Edit a template, you can use the visual editor to make the form.
Part IV: Make a C-side form page
For C-side pages such as event registration and appointment registration, personalized design is required to improve user experience. For such scenarios, a set of templates can be designed and implemented using any front-end technology stack. Here is a demo of VUE3 implementation. Source address: https://github.com/YaoApp/demo-widget-front
Step 1: Add an API to read table configuration information
Add a GET /page/form/setting/:name API, under the apis folder, add a page.http.json file, add an interface, the first parameter is the form name.
{"name": "Table Setting","version": "1.0.0","description": "Table Setting","group": "page","guard": "-","paths": [{"path": "/form/setting/:name","method": "GET","guard": "-","process": "xiang.table.Setting","in": ["$param.name", ":query"],"out": { "status": 200, "type": "application/json" }}]}
Source address: [https://github.com/YaoApp/demo-widget/blob/main/apis/page.http.json](https://github.com/YaoApp/demo-widget/blob/main/apis /page.http.json)
Step 2: During SETUP, request to configure the interface to obtain configuration information.
const url = `${window.location.protocol}//${window.location.host}/api/page/form/setting/${formName}`;const response = fetch(url);response.then((res) => {return res.json();}).then((data) => {formTitle.value = data.name;const fieldset = data?.edit?.layout?.fieldset || [];const columns = fieldset.length > 0 ? fieldset[0]?.columns : [];const mapping = data?.columns || {};columns.forEach((col: any) => {let column = mapping[col.name] || false;if (column?.edit) {let name = column.edit.props?.value || "";column.edit.label = col.name;column.edit.field = name.replace(":", "");column.edit.type = components[column.edit.type];formItems.value.push(column.edit);}});loading.value = true;}).catch((err) => {console.log("ERR", err);failure.value = err.message;});
Source address: [https://github.com/YaoApp/demo-widget-front/blob/main/vue3/src/App.vue](https://github.com/YaoApp/demo-widget-front/blob /main/vue3/src/App.vue)
Step 3: Dynamically render the form
Use the component component to render the form according to the configuration
<template><div v-if="loading"><div class="header">{{ formTitle }}</div><form><div class="form-item" v-for="item of formItems" :key="item.label"><div class="label">{{ item.label }}</div><component :is="item.type" :name="item.field"></component></div><div class="form-item" v-if="formItems"><button class="button" type="button">Submit</button></div></form></div><div v-else-if="failure" class="failure">{{ failure }}</div><div v-else><div>Loading...</div></div></template>
Source address: [https://github.com/YaoApp/demo-widget-front/blob/main/vue3/src/App.vue](https://github.com/YaoApp/demo-widget-front/blob /main/vue3/src/App.vue)
Step 4: Copy artifacts to UI directory
YAO has a built-in HTTP server, which can be accessed by copying the product to the ui directory
npm run buildcp -r dist ../demo-widget/ui/vue3
Source address: https://github.com/YaoApp/demo-widget/tree/main/ui/vue3
Preview
Open the browser, enter http://your-host:port/xiang/login/admin to enter the background, enter and save a form.
Default username: xiang@iqka.com
Default password: A123456p+
Open http://your-host:port/vue3/?form=dyform.instance_1 to access the custom form page
Use YAO Widget to create a dynamic forms system
70% of the functions of most business systems and admin panel are the addition, deletion, modification. The implementation of these functions is mainly based on copying and pasting modified fields. This article will try to write such functionality in a more elegant "copy-paste" way. If you want to say goodbye to tedious repetitive work, or you need to build your own cloud form system, the following content can help you.
DEMO
Through the form editor, online design and production of form function modules. Function modules suitable for user management, supplier management, order management and other form CURD operations.
Source address: https://github.com/YaoApp/demo-widget
One-click deployment: https://letsinfra.com/openapp/demo-widget
build tools
YAO App Engine
YAO is an open-source application engine, written in Golang, in the form of a command-line tool that can be downloaded and used immediately. It is suitable for developing business systems, website/APP API, admin panel, self-built low-code platforms, etc.
YAO adopts a flow-based programming model to implement various functions by writing YAO DSL (Logical Description in JSON format) or using JavaScript to write processes. The YAO DSL can be written in several ways:
Purely hand-written
Use automated scripts to generate contextual logic
Use the visual editor to create by "drag and drop"
GitHub Repo: https://github.com/yaoapp/yao Github Stars: 4.3K License: Apache 2.0 Documentation: https://yaoapps.com/doc
YAO Widget
YAO abstracts common function modules into widgets, describes differences through YAO DSL, and quickly replicates various functions. During development, if you develop a similar function module, you need to copy and paste the existing functions and replace the differences in batches. YAO provides a new way to use DSL to describe the difference content and quickly "copy and paste" a function module to improve development efficiency.
YAO has a built-in set of Widgets, covering most of the common functions of application development.
| Built-in Widget | Function |
|---|---|
| model | Data Structure Modeling |
| flow | Data logic arrangement |
| api | RESTFul API |
| table | table CURD |
| chart | data chart |
| login | User login |
| register | User registration |
| task | Concurrent tasks |
| schedule | Scheduled tasks |
| socket | Socket |
| websocket | WebSocket |
Widget supports developer customization, which can customize DSL based on its own business logic characteristics, and quickly copy various general functions. This article will implement a cloud table system by custom Widget.
Actual combat: Simple and practical cloud form system
Part I: Making a dyform Widget
Preparation: Install the YAO command
To read the following content, you need to have basic programming ability, familiar with RESTFul API, relational database, JavaScript language and other programming common sense. Reference Document Getting Started Guide, install the YAO command (version: v0.10.1) locally, and be familiar with the basic usage.
Create a project:
# Create a project foldermkdir -p /your/project/root# Initialize the projectyao init# Create data table & initialize menuyao migrate && yao run flows.setmenu
Step 1: Design the Widge DSL structure
Design the DSL structure according to the business logic features. In this example, the differences between different tables are table fields, searchers, and table names. dyform Widget DSL data structure:
{"name": "TEST","decription": "A TEST DYFORM","columns": [{"title": "First Name","name": "name","type": "input","search": true,"props": {"placeholder": "Please input your first name"}},{"title": "Amount","name": "amount","type": "input","search": true,"props": {"placeholder": "Please input amount"}},{"title": "Description","name": "desc","type": "textArea","props": {"placeholder": "Please input Description"}}]}
Fields:
| Field | Description |
|---|---|
| title | The title displayed in the table |
| name | Field name, corresponding to database field name |
| type | The component used when filling out the form |
| props | Component properties |
| search | Whether this field can be used as a filter item |
Create a dyforms file for saving the DSL
cd /your/project/rootmkdir dyforms
Save the above DSL to the dyforms/demo.form.json file for debugging.
Step 2: Create the dyform Widget
Create the dyform widget:
cd /your/project/rootmkdir -p widgets/dyform# create widget filetouch widgets/dyform/widget.json # Widget basic informationtouch widgets/dyform/compile.js # dyform DSL compilertouch widgets/dyform/process.js # dyform handlertouch widgets/dyform/export.js # dyform exports built-in widget definitions
Tip: YAO custom widgets are placed in the widgets directory, which needs to be created manually.
Use an editor to open dyform/widget.json and fill in the basic information of the dyform widget
{"label": "Dynamic Form","description": "A form widget. users can design forms online","version": "0.1.0","root": "dyforms","extension": ".form.json","modules": ["Models", "Tables"]}
Field Description:
| Configuration Items | Description |
|---|---|
| label | Widget name, displayed in the visual editor. |
| description | Widget introduction, displayed in the visual editor. |
| version | version number |
| root | DSL file save path (relative to the project root directory) |
| extension | DSL file extension |
| modules | Modules that need to be exported. According to the DSL description in export.js, the converted YAO built-in widgets. Such as model, table, etc. These widgets are equivalent to DSL files saved in the project directory. |
Step 3: Write the dyform handler
Write dyform/process.js script, implement Model, Table processor, convert custom DSL into YAO data model widget and table widget.
Write the Export function, declare the processor to be exported, View source
function Export() {return { Model: "Model", Table: "Table" };}
Implement Model & Table processor logic
| Processor | Description | Source link |
|---|---|---|
| Model | Convert dyform DSL to model DSL, which is equivalent to manually writing a xxx.mod.json DSL file in the models folder | [View source](https://github.com/YaoApp/demo-widget/blob/ main/widgets/dyform/process.js#L11) |
| Table | Convert dyform DSL to table DSL, which is equivalent to manually writing a xxx..json DSL file in the tables folder | [View source](https://github.com/YaoApp/demo-widget/blob/main /widgets/dyform/process.js#L27) |
Tip: It is recommended to use the yao run command to debug the processor, refer to the source code comment documentation.
Step 4: Export as Model & Table widget
Write dyform/export.js script, implement Models, Tables functions, export as YAO model & table widgets.
| Export function | Description | Source code link |
|---|---|---|
| Models | Call the Model processor to export the Yao model widget, the data structure is {MODEL_NAME:String: Model_DSL:Object} | [View source code](https://github.com/YaoApp/demo-widget/blob/main/widgets /dyform/export.js#L10) |
| Tables | Call the Table processor, export it as Yao table widget, the data structure is: {TABLE_NAME:String: Table_DSL:Object} | [View source code](https://github.com/YaoApp/demo-widget/blob/main /widgets/dyform/export.js#L24) |
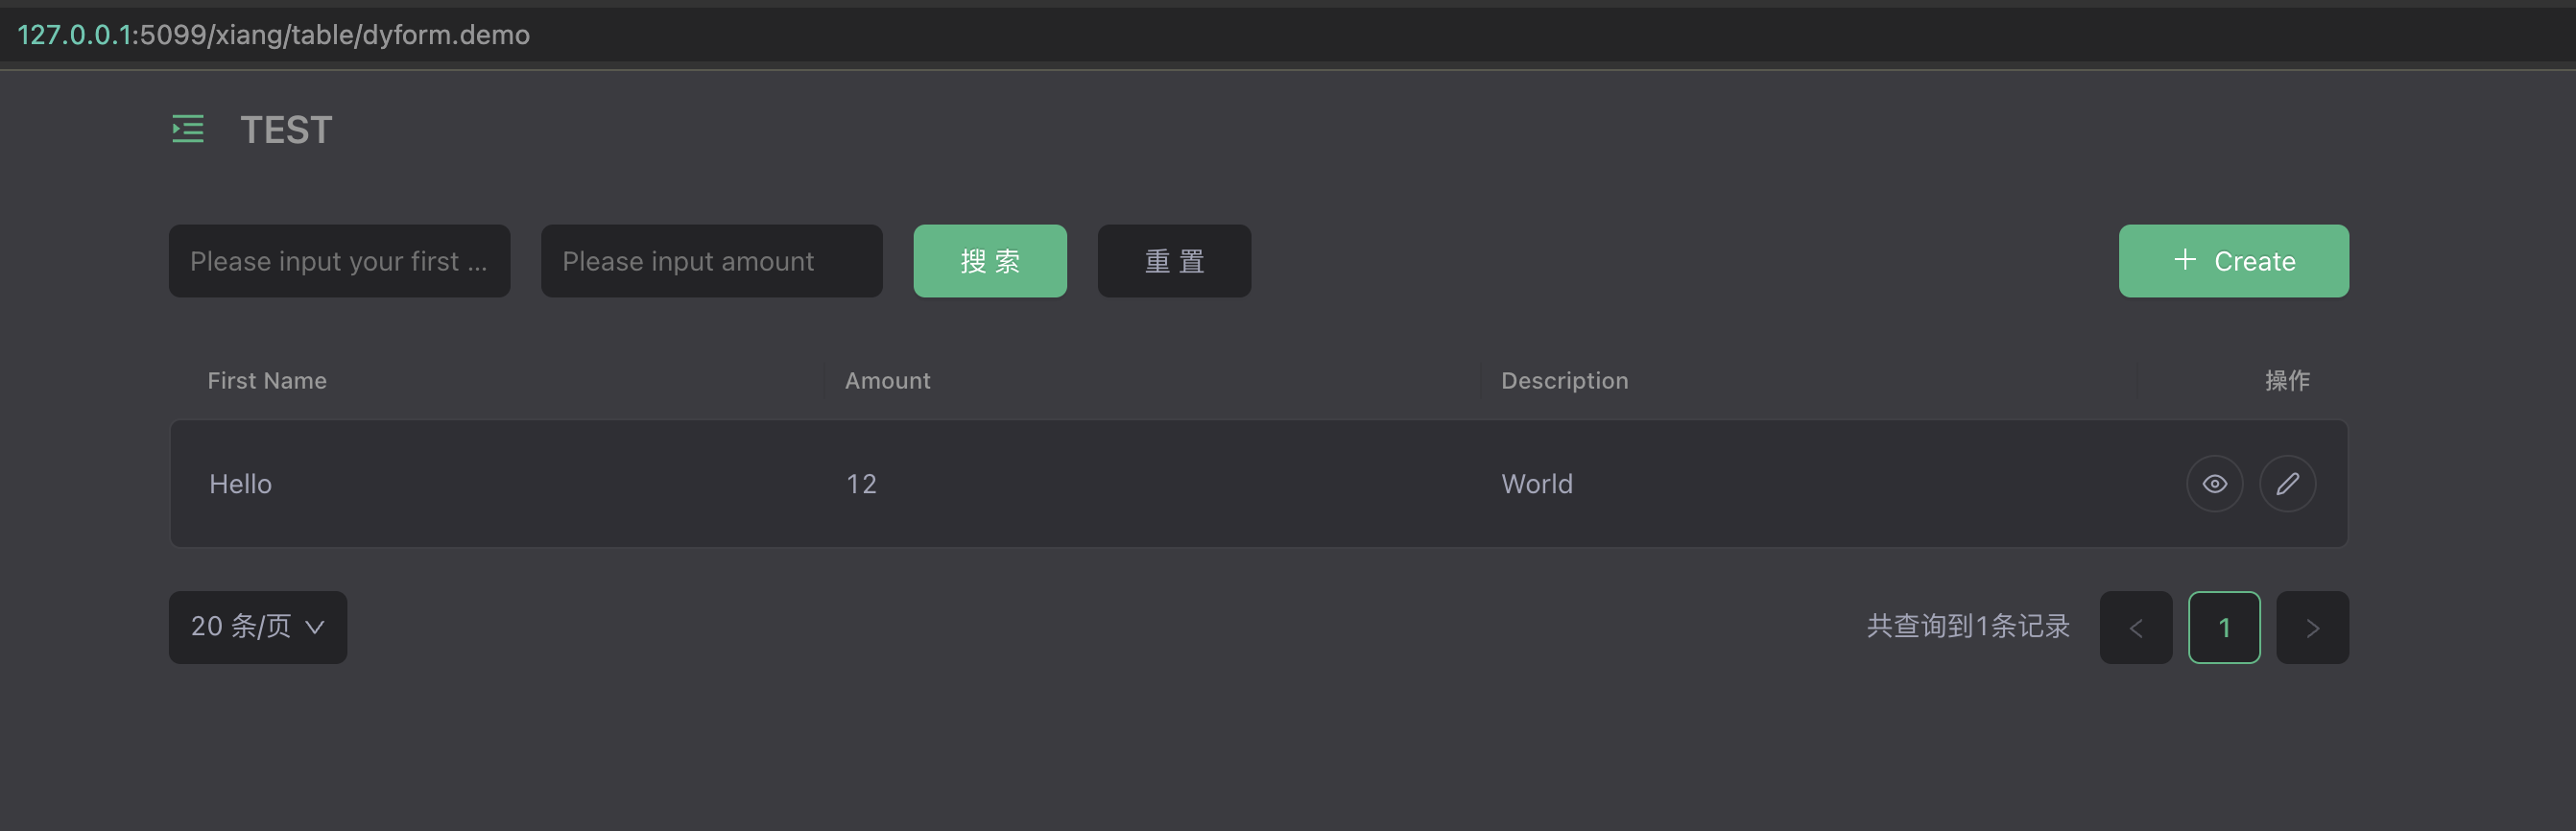
Preview
In the dyforms folder, add the xxx.form.json file and write the dyform DSL description file to quickly create a set of form management modules, form APIs, form processors and model processors.
Use the yao migrate command to create the data table structure, the yao start command to start the service, and log in to the management interface to use the table management function. Routing address: http://127.0.0.1:5099/xiang/table/dyform.xxx
Part II: Save the dyform DSL to the database for dynamic read and write
If you want to open the form making function to the user, and the code directory should be set to read-only under normal circumstances, it is impossible to dynamically create a DSL file. With a little modification to the dyform widget, save the dyform DSL in the database.
Step 1: Create a template model to store the dyform DSL
How to create and use data models models/template.mod.json and manage tables tables/template.tab.json, refer to Model and Table
models/template.mod.json is as follows
{"name": "Template","table": { "name": "template", "comment": "For dyform DSL source" },"columns": [{ "label": "ID", "name": "id", "type": "ID", "comment": "ID" },{ "label": "Name", "name": "name", "type": "string", "index": true },{"label": "DSL","name": "dsl","type": "text","comment": "DSL"}],"values": [],"option": { "timestamps": true, "soft_deletes": true }}
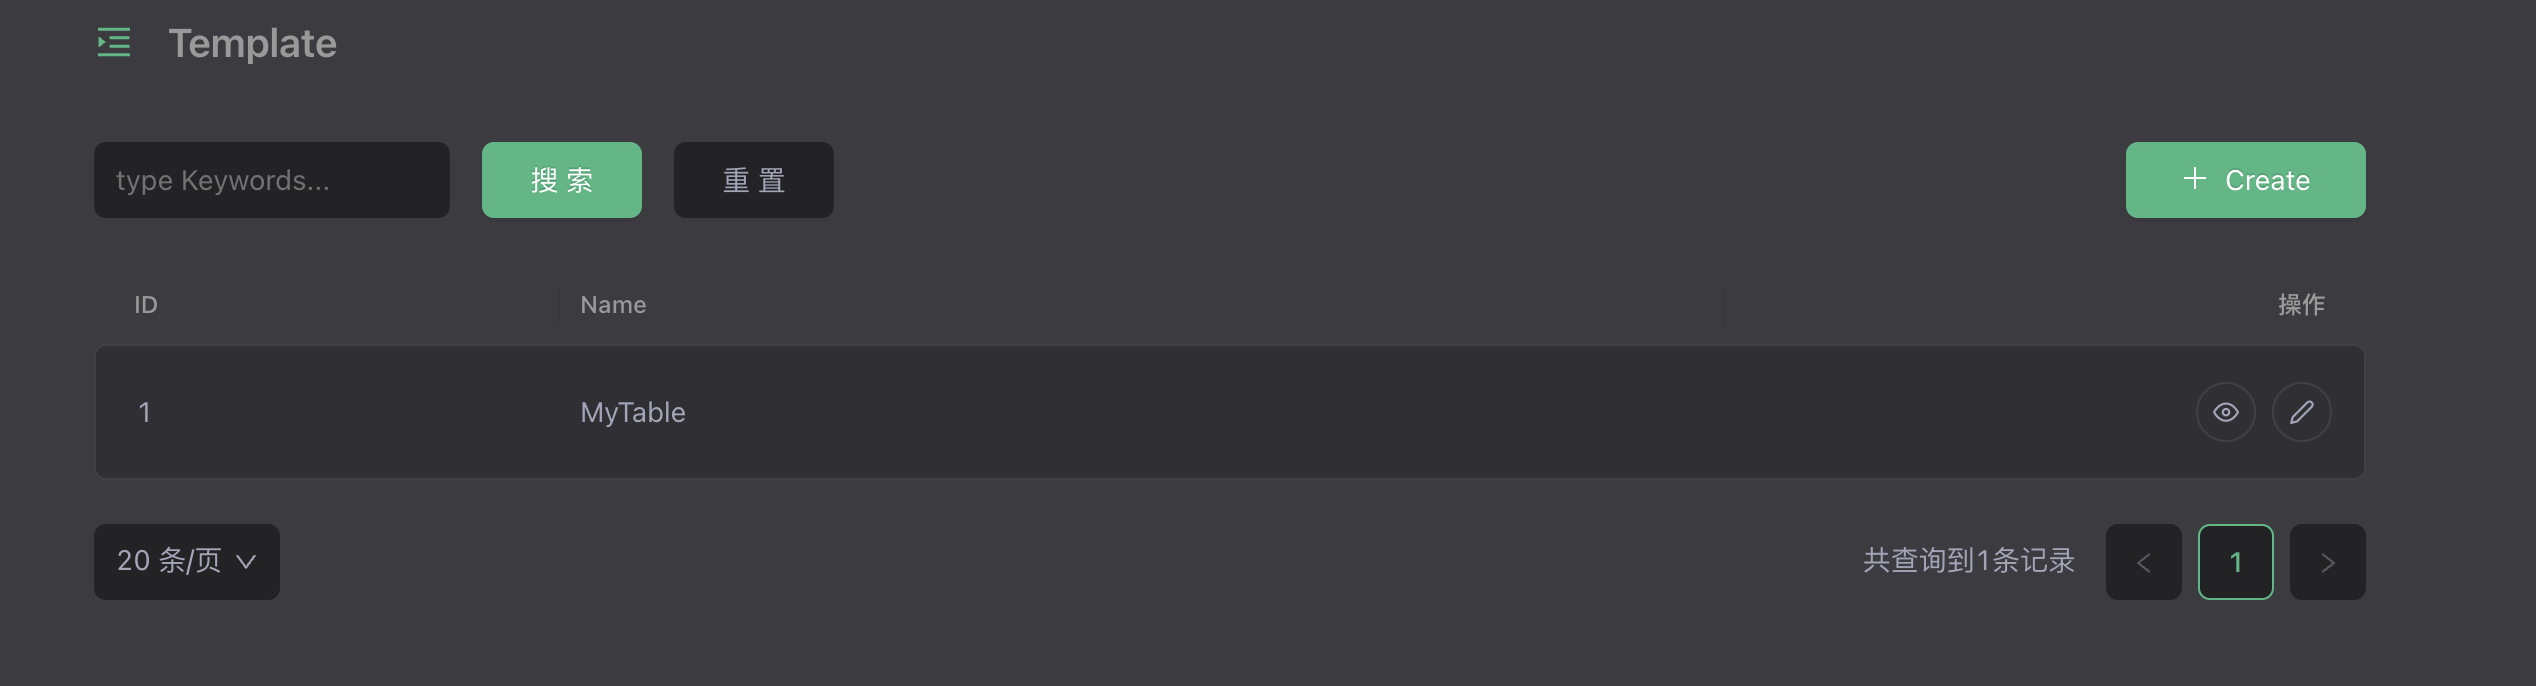
DSL management interface
Step 2: Add Save & Delete handler to dyform Widget
Write the Export function, declare the processor to be exported, View source
function Export() {return { Model: "Model", Table: "Table", Save: "Save", Delete: "Delete" };}
Implement Save & Delete handler logic
| Processor | Description | Source link |
|---|---|---|
| Save | Convert the dyform DSL to the model DSL, update the corresponding data model structure, and reload the corresponding instance. | View source |
| Delete | Delete the data table corresponding to the data model | View source code |
Edit tables/template.tab.json, add hooks scripts, update/delete data tables, create/delete menus when tables are saved and deleted.
Modify tables/template.tab.json to add Hook View source code** **
"hooks": {"after:save": "scripts.template.AfterSave","after:delete": "scripts.template.AfterDelete"},
Add hooks script scripts/template.js View source code
| Hook | Instructions |
|---|---|
| AfterSave | According to the DSL, update the dyform data table and add a menu |
| Delete | Deletes the dyform table and removes the menu |
Step 3: Add content source to dyform Widget
Edit widgets/dyform/compile.js , read DSL from database
/*** Source* Where to get the source of DSL*/function Source() {var sources = {};tpls = Process("models.template.Get", { select: ["id", "dsl"], limit: 1000 });if (tpls.code && tpls.message) {log.Error("Load dyform sources: %s", tpls.message);return sources;}tpls.forEach((tpl) => {tpl = tpl || {};try {instance = `instance_${tpl.id}`;dsl = JSON.parse(tpl.dsl);sources[instance] = dsl;} catch (e) {log.Error("Source %v DSL: %s", tpl.id, e.message);return;}});return sources;}
Compile.js method description View documentation
| Hook | Instructions |
|---|---|
| Source | Custom DSL data source read logic |
| Compile | Adjust DSL structure or prepare related resources based on context or environment information |
| OnLoad | This method is called when the DSL is loaded. |
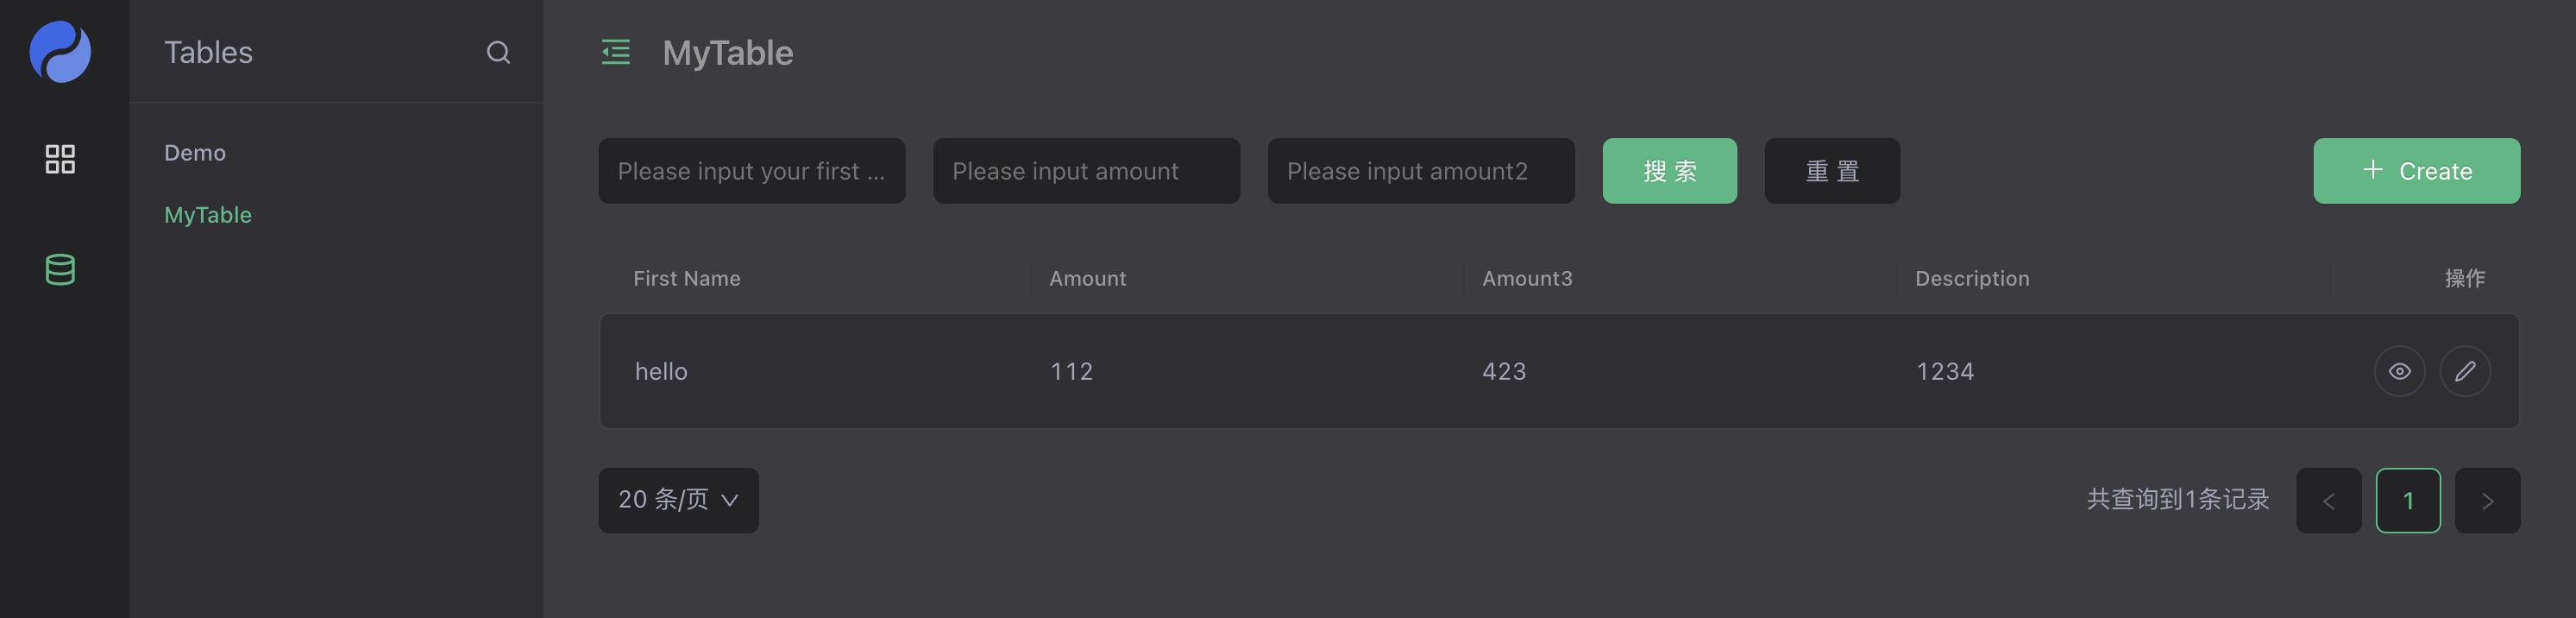
Preview
Log in to the management background and dynamically add dyform DSL to dynamically create and delete corresponding forms.
Part III: Visual Form Editor
The form DSL can be generated using the form authoring tool. There are many excellent open source form editors to choose from, such as XXXX. In order to demonstrate the effect, XGEN quickly implements a DEMO-level editor component, and the product-level implementation will Available when XGEN-NEXT (official version) is released.
Source address: [https://github.com/YaoApp/xgen/tree/main/src/cloud/components/form/FormPrinter](https://github.com/YaoApp/xgen/tree/main/src/cloud /components/form/FormPrinter)
Step 1: Adapt the editor component input and output
Add Hook to template table to transform DSL structure. Edit tables/template.tab.json file, scripts/template.js file
Add **before:save** hook
Convert editor component output to form DSL
tables/template.tab.json
{..."hooks": {"before:save": "scripts.template.BeforeSave","after:save": "scripts.template.AfterSave","after:delete": "scripts.template.AfterDelete"}...}
scripts/template.js
/*** BeforSave Hook: transform the form editor data to the DSL* @param {*} payload*/function BeforeSave(payload) {payload = payload || {};columns = payload.dsl || [];payload["dsl"] = { columns: [], name: payload.name || "UNTITLE" };columns.forEach((column) => {let type = column.id || "";payload["dsl"].columns.push({title: column.title || "UNTITLE",name: column.bind,type: type.toLowerCase(),props: column.props || {},});});payload["dsl"] = JSON.stringify(payload["dsl"]);return [payload];}
tips : But use the yao run command to debug for example:
yao run scripts.template.BeforeSave '::{"dsl":...}'
Add **after:find** hook
Convert form DSL to component input structure
tables/template.tab.json
{..."hooks": {"after:find": "scripts.template.AfterFind","before:save": "scripts.template.BeforeSave","after:save": "scripts.template.AfterSave","after:delete": "scripts.template.AfterDelete"}...}
scripts/template.js
/*** AfterFind Hook: transform the DSL format to the form editor needs* @param {*} id* @param {*} template*/function AfterFind(template, id) {let dsl = JSON.parse(template["dsl"]);let columns = dsl.columns || [];let types = { input: "Input", select: "Select" };template["dsl"] = [];columns.forEach((column) => {// let props = column.props || {};// let search = props.showSearch ? true : false;template["dsl"].push({title: column.title,bind: column.name,id: types[column.type],props: column.props || {},search: true,width: 6,chosen: false,selected: false,});});return template;}
Step 2: Update the components bound by the DSL
Edit the tables/template.tab.json file and set the DSL field editing component to FormPrinter.
Source address: [https://github.com/YaoApp/demo-widget/blob/main/tables/template.tab.json](https://github.com/YaoApp/demo-widget/blob/main/tables /template.tab.json)
{...."Form Editor": {"label": "Form Editor","edit": { "type": "FormPrinter", "props": { "value": ":dsl" } }}...}
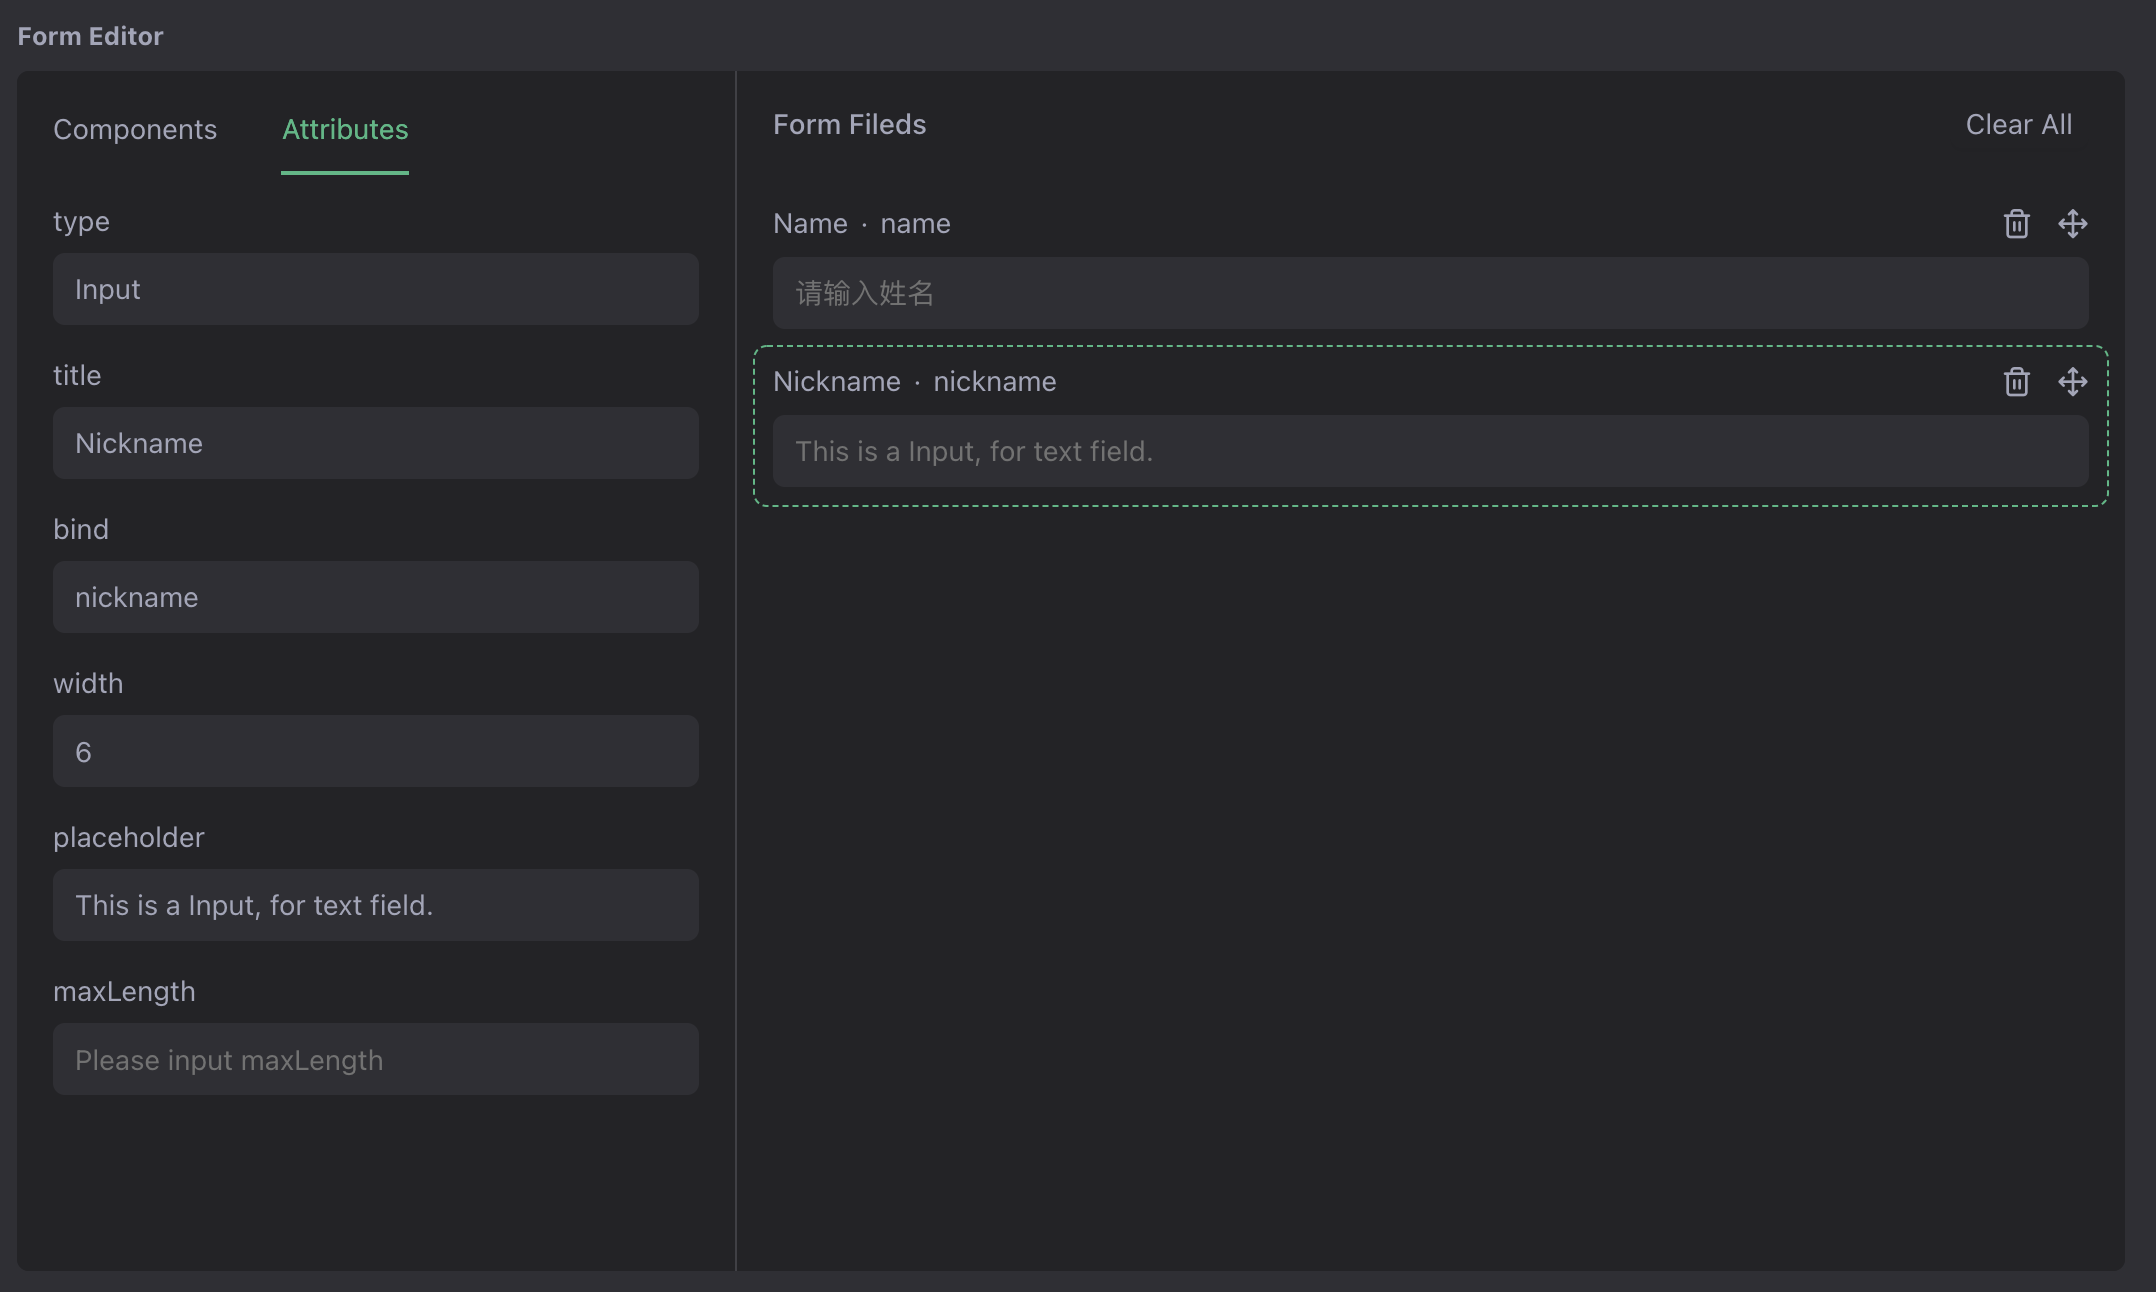
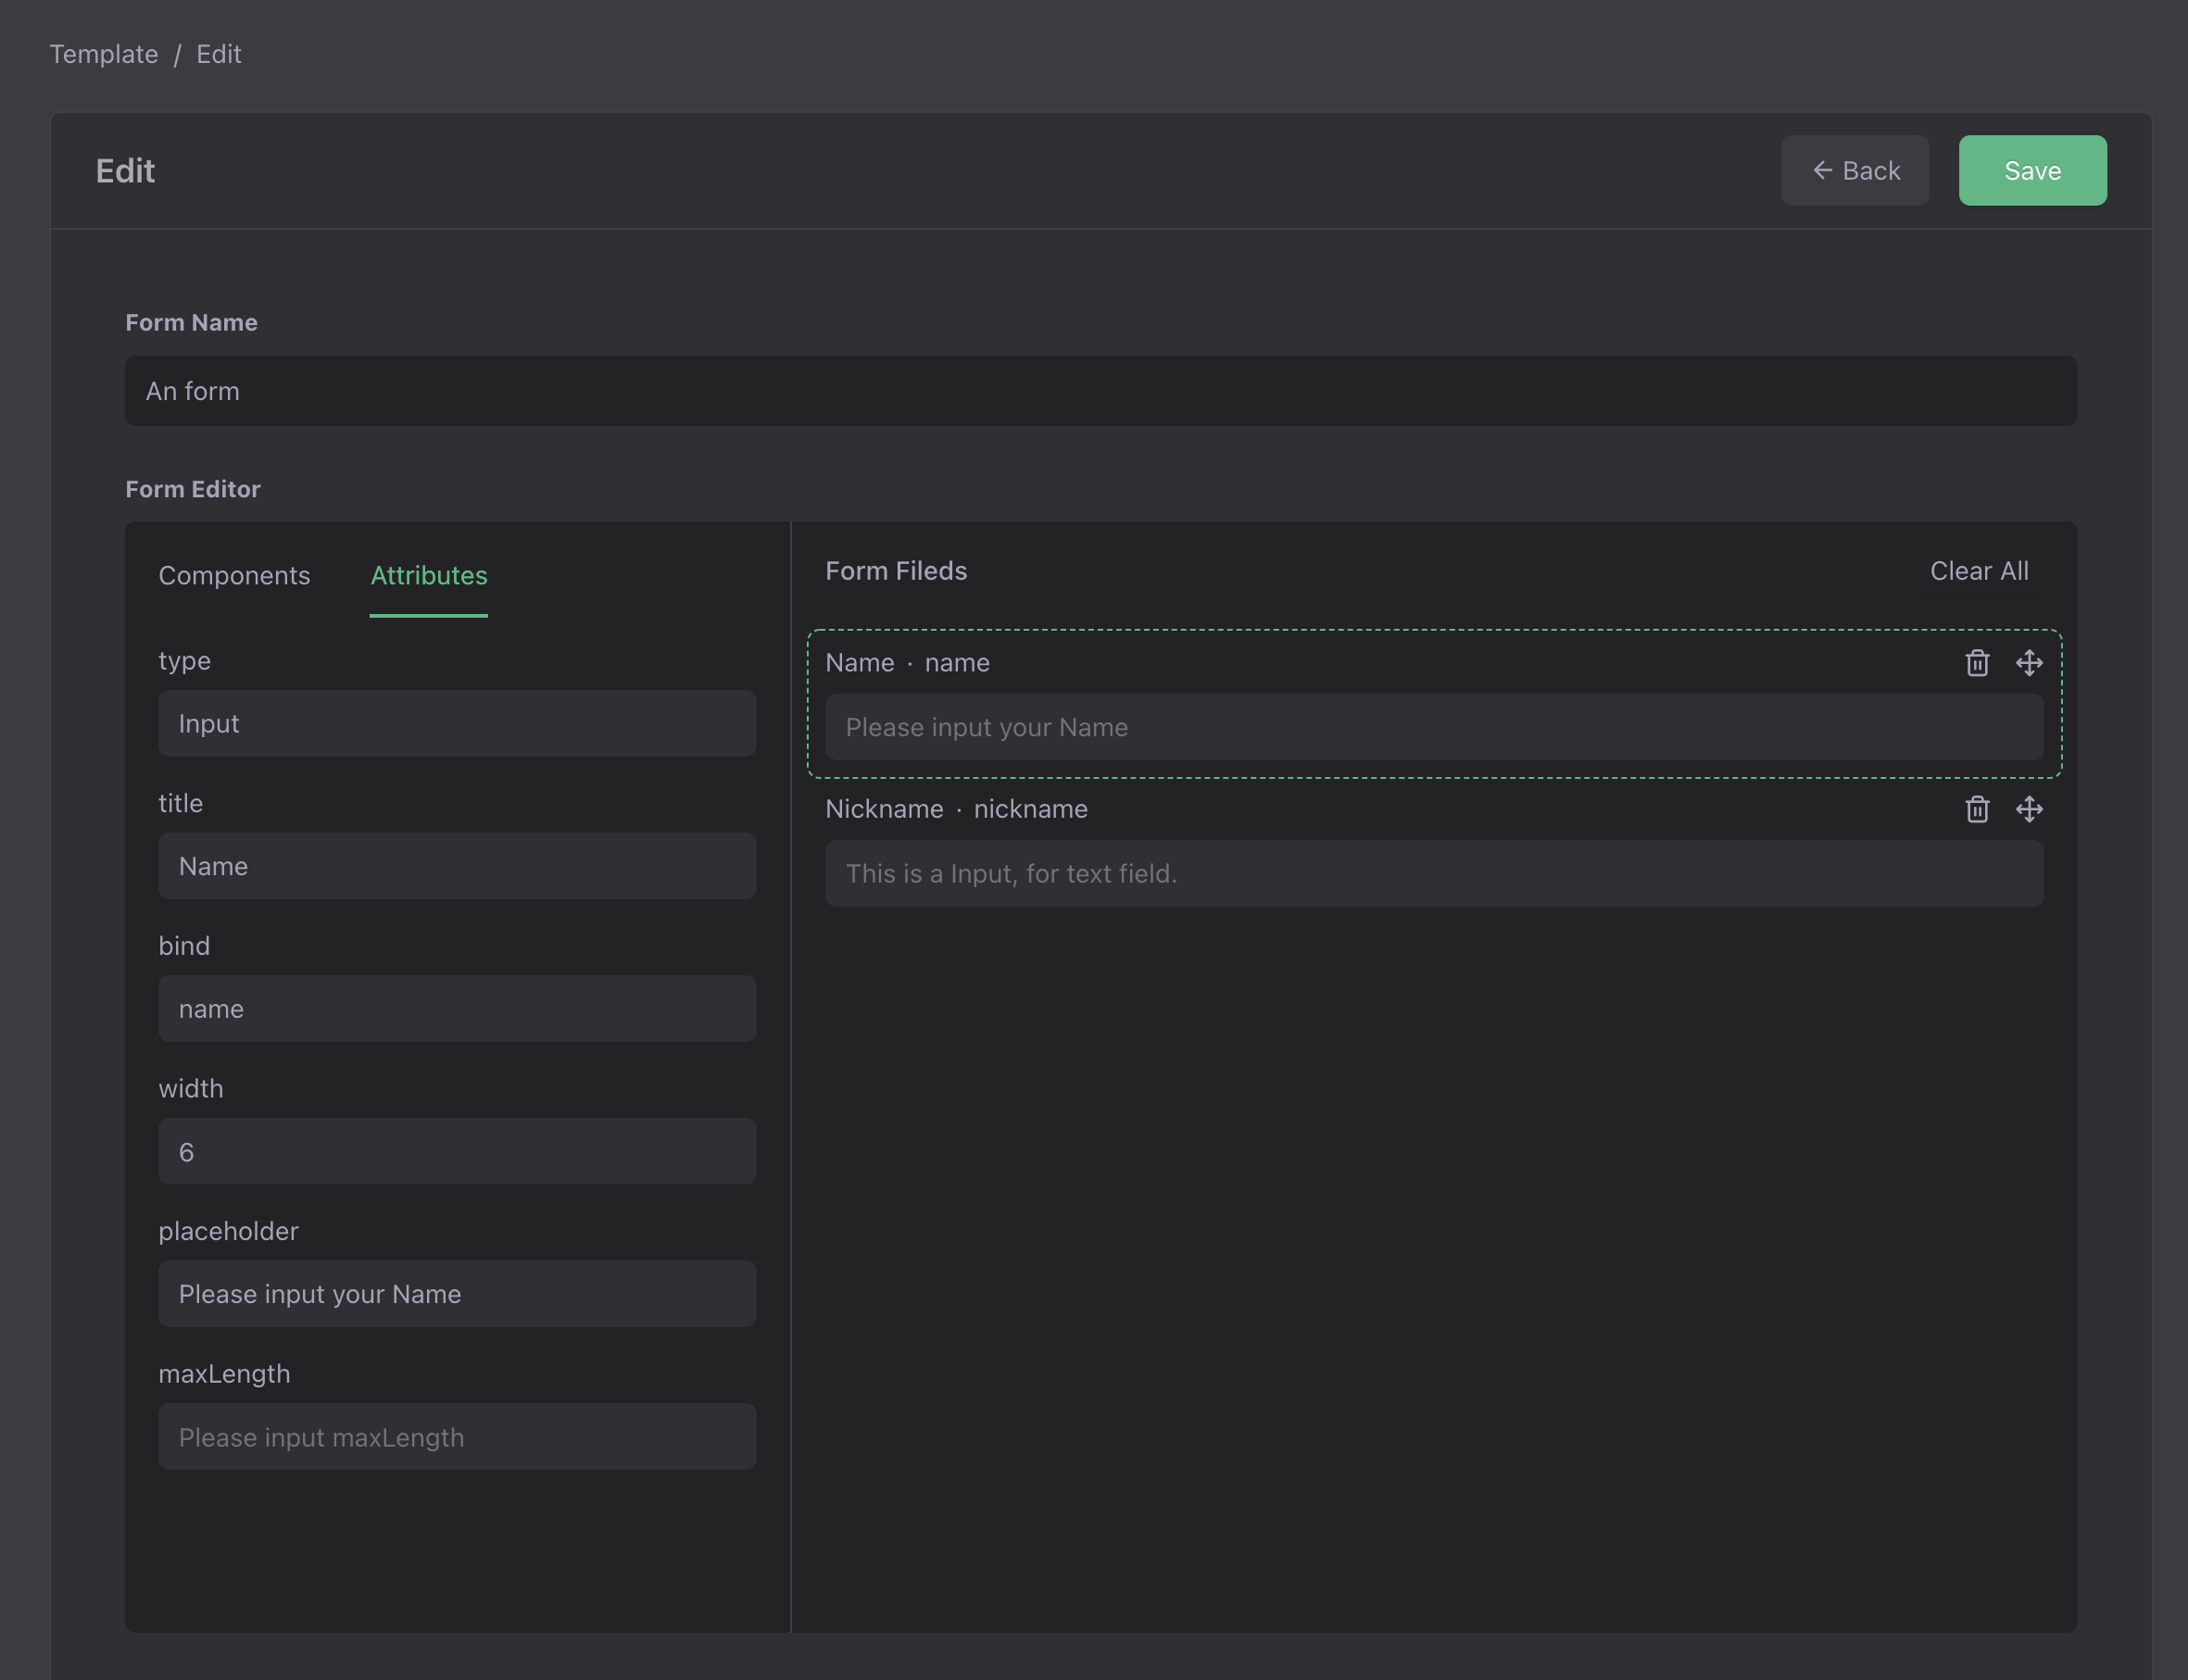
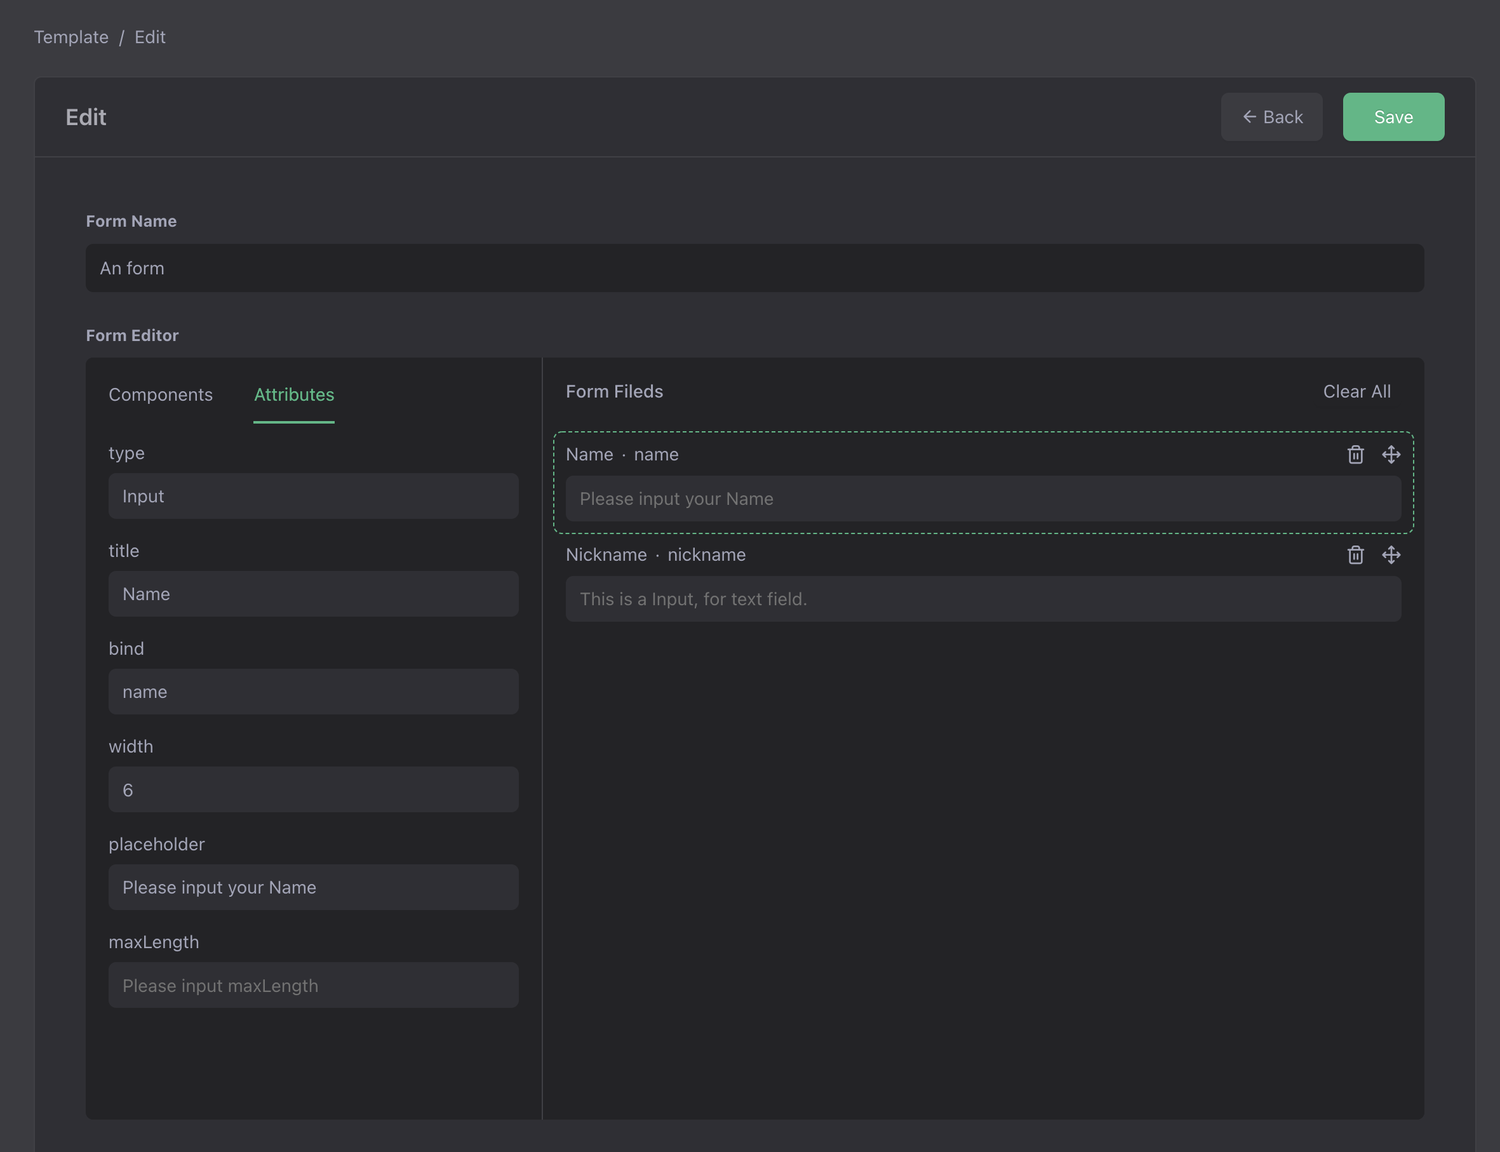
Preview
Open the templates table, click Edit a template, you can use the visual editor to make the form.
Part IV: Make a C-side form page
For C-side pages such as event registration and appointment registration, personalized design is required to improve user experience. For such scenarios, a set of templates can be designed and implemented using any front-end technology stack. Here is a demo of VUE3 implementation. Source address: https://github.com/YaoApp/demo-widget-front
Step 1: Add an API to read table configuration information
Add a GET /page/form/setting/:name API, under the apis folder, add a page.http.json file, add an interface, the first parameter is the form name.
{"name": "Table Setting","version": "1.0.0","description": "Table Setting","group": "page","guard": "-","paths": [{"path": "/form/setting/:name","method": "GET","guard": "-","process": "xiang.table.Setting","in": ["$param.name", ":query"],"out": { "status": 200, "type": "application/json" }}]}
Source address: [https://github.com/YaoApp/demo-widget/blob/main/apis/page.http.json](https://github.com/YaoApp/demo-widget/blob/main/apis /page.http.json)
Step 2: During SETUP, request to configure the interface to obtain configuration information.
const url = `${window.location.protocol}//${window.location.host}/api/page/form/setting/${formName}`;const response = fetch(url);response.then((res) => {return res.json();}).then((data) => {formTitle.value = data.name;const fieldset = data?.edit?.layout?.fieldset || [];const columns = fieldset.length > 0 ? fieldset[0]?.columns : [];const mapping = data?.columns || {};columns.forEach((col: any) => {let column = mapping[col.name] || false;if (column?.edit) {let name = column.edit.props?.value || "";column.edit.label = col.name;column.edit.field = name.replace(":", "");column.edit.type = components[column.edit.type];formItems.value.push(column.edit);}});loading.value = true;}).catch((err) => {console.log("ERR", err);failure.value = err.message;});
Source address: [https://github.com/YaoApp/demo-widget-front/blob/main/vue3/src/App.vue](https://github.com/YaoApp/demo-widget-front/blob /main/vue3/src/App.vue)
Step 3: Dynamically render the form
Use the component component to render the form according to the configuration
<template><div v-if="loading"><div class="header">{{ formTitle }}</div><form><div class="form-item" v-for="item of formItems" :key="item.label"><div class="label">{{ item.label }}</div><component :is="item.type" :name="item.field"></component></div><div class="form-item" v-if="formItems"><button class="button" type="button">Submit</button></div></form></div><div v-else-if="failure" class="failure">{{ failure }}</div><div v-else><div>Loading...</div></div></template>
Source address: [https://github.com/YaoApp/demo-widget-front/blob/main/vue3/src/App.vue](https://github.com/YaoApp/demo-widget-front/blob /main/vue3/src/App.vue)
Step 4: Copy artifacts to UI directory
YAO has a built-in HTTP server, which can be accessed by copying the product to the ui directory
npm run buildcp -r dist ../demo-widget/ui/vue3
Source address: https://github.com/YaoApp/demo-widget/tree/main/ui/vue3
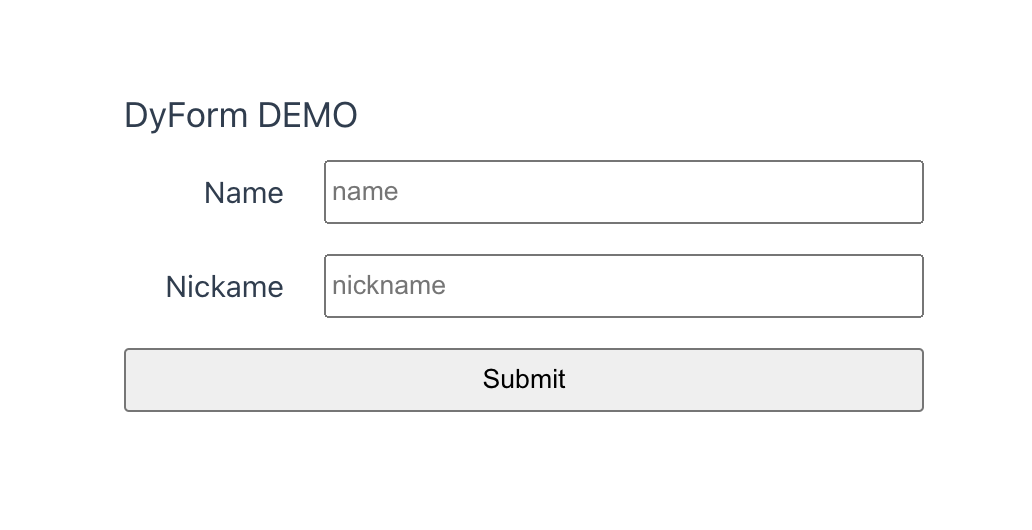
Preview
Open the browser, enter http://your-host:port/xiang/login/admin to enter the background, enter and save a form.
Default username: xiang@iqka.com
Default password: A123456p+
Open http://your-host:port/vue3/?form=dyform.instance_1 to access the custom form page